Wednesday, February 25, 2009

Promote your blog via Flickr

Do you use Flickr? You'll love this tip to use Flickr to promote your blog.

1. First of all, when you log into Flickr, click on the drop down arrow by the tab You and select Your Account.

2. This will bring you the the tab that says Personal Information. Click the tab that says Extending Flickr. Look for Your Blogs and click Edit.

3. Click Add A Blog and follow the instructions. If you want to add more than one blog, repeat the process for each blog you want to add.

4. Next, go to a picture that you want to use in a blog post. Above the picture, click Blog This and follow the instructions to post it to your blog. You'll see that there is a place for you to add text to the blog post. If you know a little HTML you can also include formatting like bold and italic, as well as links.

5. Post the picture to your blog, then click the link provided by Flickr to visit your blog. (It will open up in a new window so you won't lose your place at Flickr.)

Here is an example of one that I posted to my other blog:
------------------------------------------------

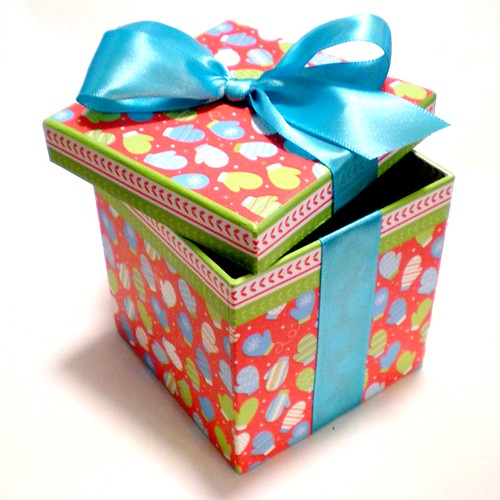
You can make this in my quick and super easy tutorial: How To Dress Up A Gift Box


------------------------------------------------

6. While at your blog, copy the link for the blog post you just made, then go back to Flickr and click return to this item's page.

7. Just below your picture there is a box to add a description. The box turns yellow when you hover your mouse over it. (It's above Comments.) Add a description and invite viewers to visit your blog post for more information. Here's where you'll need a little HTML to insert the link. If you're not sure how to add links with HTML, just copy this code:
<a href="
then without adding any spaces, paste your link and follow it by
">
next, type in the text you want people to click on and follow that by
</a>
Your completed link should look something like this in HTML:
<a href="http://passitonplatesblog.blogspot.com/2008/12/how-to-dress-up-gift-box.html"> How To Dress Up A Gift Box</a>
and your readers will see:
How To Dress Up A Gift Box

8. Add tags to your picture.

9. Now you're ready to promote your blog. Near the top of the Flickr page, click the drop down arrow for Groups and click on Search for a Group. Start searching based on your keywords, but don't forget to use category keywords as well, such as craft, food, family, etc. Join any and all groups where sharing your picture would be appropriate. The more, the better. I really don't know how many groups are on Etsy, but I guarantee there are thousands and thousands and I'm sure you'll find at least one that your picture fits into.

Do you sell on Etsy? Try these groups:
Etsy-Look and Learn
Craft
Get Crafty
Crazy For Knitting
Artisan Jewelry on Etsy
Painted Furniture
Softies

10. Watch your blog traffic. Depending on the "interestingness" of your picture, you could get a lot of traffic. This gift box photo has given me a nice bump in traffic, and even though I posted it over a month ago, I'm still getting a trickle of traffic from it. Your Flickr stats also show how many views that picture gets and you can even learn what search keywords people are using to get to your photo. If you include these words in your actual blog post, that will help guide search engine users to your blog post as well.


Two very important notes:

1. Flickr TOS requires that when you blog about a picture, the picture must link back to its page on filckr. If you like messing with your HTML, don't change where the picture leads to.

2. Flickr TOS also forbids selling on Flickr. If you have photographed something you have in your shop, you can blog about it but you cannot include links to your Etsy shop or mention that the item is for sale in the Flickr description.

(And remember, all comments are do-follow, so your comment left here supports YOU.)


Did you like this post? How about subscribing in a reader
or by Email?


Monday, February 23, 2009

Apology

Sometimes my blog posts are super long, like the two from last week. I know you don't have a lot of time to read through everything, and I'd like to apologize for the long posts.

There are just so many useful things I want to tell you to help your business grow, that it's sometimes necessary to publish long posts. I have been breaking up the original post so you can learn about the concept on Monday and then learn how to put it to use on Wednesday. I hope that format works for you.

I guess you could think of this blog as a mini marketing class.

Meanwhile, if there's anything you'd like me to post about or a format that I should consider to make it easier for you to learn and improve your business, please let me know.

Thanks!


Did you like this post? How about subscribing in a reader
or by Email?


(And remember, all comments are do-follow, so your comment left here supports YOU.)


Wednesday, February 18, 2009

Word of Mouth Gift Campaign tutorial

On Monday I showed you this Valentine Card from Krispy Kreme.
Today I'd like to tell you how you can create this kind of promotion for your own biz, blog, or shop.

If you're just joining us, you may want to go back and read Monday's post to learn the basics of this kind of promotion.


In Monday's blog post, I suggested different kinds of items you could give away for this kind of promotion. Since cards are easy, though, let's explore that avenue.

You can use your own images to print greeting cards at Flickr (check on Extending Flickr,) Photobucket, Vistaprint, pretty much any online photo storage site, your local photo printing shop, a local copy shop, or if you have a high-quality printer you could print your own. (Be careful about using your own printer, though. These cards cannot look cheap.) You could also get blank greeting cards at a craft store and use a quality photo adhesive to attach printed photos to the cards.

If you make your own photo cards, be sure to sign the card under the photo, just like artists sign their work. This elevates the perception of quality and makes the card more "exclusive." Besides, you need your existing customers to be excited about the cards, want to send them all out, and feel good about sending their friends a quality item.

Of course, make sure your photos are clear, professional looking, and appropriate for the card. You also need to make sure that you have the rights to use the photos. (Please always respect copyright laws.)

Just so you have an idea of the cost to print cards
, the cards at Flickr (via Moo) are $24.95 for 10 greeting cards or $10.99 for 16 note cards. This is just one example in many many many options out there. You will need to do a little research (try Googling "Print your own greeting cards") and find one that is a good fit with what you're doing.

If you make cards or enjoy scrap booking, you could whip up a set of your own handmade cards, as well.

Add your coupon code to the back of the card with easy to follow instructions on how to redeem it.

Here's an example of how your promotion would work:
(I'll use my plates business as the example.)

When someone buys a Pass It On Plate Lite at the current full retail value of $29.95, they receive 5 photo birthday cards (that I made at Flickr) to send to their friends. The photo cards have a beautiful food picture on the front and the recipe inside the card on the left. On the back of the card is a coupon for a free PlateWrap (and free shipping, of course.)

If my customer sends out all five cards, and all five people redeem their free PlateWrap, here's what it cost me to acquire each new customer:
  • While I'm not going to reveal my cost vs. retail price, let's just assume my cost for each PlateWrap is $10.
  • I sent my customer $12.50 in greeting cards. (10 cards for $24.95)
  • They send out all five cards, each of whom redeem their free gift. (My cost is $10 per gift.)
  • A $10 item cost times 5 people = $50 in free merchandise
  • $50 in free merchandise + $12.50 for greeting cards = $62.50
  • $62.50 divided by 5 people is $12.50. (...an interesting coincidence.)
  • My new customer cost only $12.50 to acquire. Now I can continually market to this customer and (sit down for this) send them my regular snail mail newsletter.
Compare my $12.50 spent to find a genuine customer to the amount of money normally spent on advertising where you're hoping to generate some interest. I have done craft shows where the table cost me $25 and I only had one customer by a $5 item. That customer cost me $20, and because they paid cash and weren't interested in signing up for me newsletter, so there's no way I will be able to market to them.

$12.50 is a bargain.

Please leave comments here if you have questions about how you can make this work for you. Also, if you try this, please post links to your site or blog where you announce this promotion. I'd love to see what creative idea you came up with (and I'll do a little advertising for you.)


Did you like this post? How about subscribing in a reader
or by Email?


(And remember, all comments are do-follow, so your comment left here supports YOU.)

Monday, February 16, 2009

Happy (fill in the blank) Day, here's your Free Gift

Have I told you how incredibly powerful word of mouth advertising is?

When one of your customers tells a friend
about your product, this has a far greater impact than if the friend happened to stumble upon your website, blog, or shop or saw one of your ads somewhere.


Last year I received one of these Valentines from a friend and was tickled pink to find the coupon for a free doughnut in the valentine. Of course, I took it with me on my next trip up to Portland (the closest store to me is about 45 minutes away.) Since I rarely go to Portland alone, I had to buy doughnuts for everyone else in the car. And coffee. You can't truly enjoy a doughnut without coffee. My free coupon cost me almost $10 by the time I walked out of the shop. But I'm not complaining.

This year I saw the whole Krispy Kreme promo
and realized what a brilliant marketing campaign this is. I know this is something you could copy for your indie biz.

Basically, you're handing out coupons for your customers to give to their friends. The coupons just happen to be cleverly decorated as greeting cards that, when given away, make your customer look good.

It's a win-win-win for your customers, their friends, and of course you. Did you notice that I didn't just redeem the coupon but spent money there as well?

So... How could you make it work for your biz?

Glad you asked. I've got an idea.
(Of course.)

First, the basic mechanics of this marketing promotion is to decide what goal you want each person to achieve. Do you want people to buy, sign up for a mailing list, attend a class, or something else?

In this case, Krispy Kreme wants people to buy their doughnuts.

Second, what kind of free item or sample can you offer? Free items are perceived more as gifts; if you offer a discount, it's too sales-pitchy.

Krispy Kreme is giving away a free doughnut. While it's not a big $ value item, it has value because it's free. Heck, better than that, it's free food.

If you see on the promotion (above) you have to buy a dozen doughnuts in order to get the 12 "coupons" for a free doughnut. Basically it's a buy one, get one free. From an accounting standpoint, Krispy Kreme is offering doughnuts for up to 50% off in exchange for gaining new customers. There's a good probability that not every coupon issued will be reedeemed, either, so Krispy Kreme comes out ahead, anyway. Besides, I spent almost $10 of my own money there, and i'm sure I'm not the only one. Krispy Kreme came out way ahead.

By the way, if you're wondering if I analyze the mechanics of every advertisement I see, the answer is yes. Call me nuts, but I can't get enough of this stuff. The way I figure it, if I can translate that into understandable terms that you could pull off on your own for your biz, then I'm happy.

Third, what can you do to inspire your customers want to give away your coupons?
Krispy Kreme, of course, made Valentines.

While it's too late for you to do a Valentines Day promotion (bookmark this post for next December!) there are other holidays you could take advantage of: St. Patrick's Day, Easter, (people only send a small handful of Mothers' Day or Fathers' Day cards at the most,) Last Day of School (teacher gifts,) Independence Day, First Day of School (teacher gifts again - it's never too early to schmooze those good grades!) Halloween, Thanksgiving, and the mother of all card-sending holidays, Christmas.

But why stop at traditional holidays?
You could give away stickers (have you been to a skate shop, Zumiez, Pac Sun, or other teenager clothing store lately??) or pads of Post It Notes, general greeting cards, or a pack of birthday cards. You could do t-shirts, hats, and totebags, but the cost of those may be prohibitive if you're trying to keep your costs down.

Since cards are easy, though, let's explore that avenue.
Check back in on Wednesday to see how this Word of Mouth Gift Campaign works.


Did you like this post? How about subscribing in a reader
or by Email?

(And remember, all comments are do-follow, so your comment left here supports YOU.)

Thursday, February 12, 2009

Giveaway. Here. Now.

As of this writing, there are 50 followers to this blog.

I'm deeply honored that so many people have chosen to follow this blog and am thrilled to see my traffic increase daily.

To commemorate the 50th person to follow this blog, let's have a giveaway. Why not? I've blogged about them enough.

How does this sound?


+ Free email marketing consultation to help get you on the right track with marketing your product or service. You choose whatever area you want to work on. (Up to 5 emails sent from me to you; equivalent to 1 hr face to face consultation.) $75 value

+ Free badge and matching Etsy shop heade
r created from your photo - this could be used for a special promotion or as your every day image - you choose. $25 value

+ Free badge (same as above) with text box for you to place on your blog. $10 value

+ Free advertising spot
for a month here, at the top of the right sidebar. $1.50 value (this could change*)

*At this moment, the Project Wonderful ad box is bidding at $.05/day, so to be fair I'll put this at a $1.50 value. With my constant increase in traffic, this would likely go up.

The total package is valued at $111.50 and will help you to "boost your biz," as my PW ads say.

To enter, leave a comment here telling me about the one marketing or promoting thing you're struggling with.

I'll keep the comments open until 11:50pm Saturday February 28 and will have Random.org help pick a winner on March 1st. Winner will be announced on March 2. Giveaway open worldwide; be sure to leave me an email address or a link to your blog/website/online store.


Wednesday, February 11, 2009

Button with HTML Code Box Tutorial

Photobucket


Ever stumble across a blog that has something like this
in the sidebar on in a blog post? Would you like one for your blog? It's actually pretty easy.

Before starting, I just wanted to make sure you know that if you want the badge to point to your website, blog, or etsy store, you cannot use your Flickr account. Sure, you could use Flickr to edit the photo and add words or whatever, but you need to upload it to Photobucket.

If you're not too familiar with Photobucket, here's the skinny
- it's kinda sorta like Flickr, but with different TOS. Photobucket allows photos hosted there to be used as links to other sites outside of Photobucket. Photos hosted on Flickr have to link back to the original photo on the Flickr site.

1. Upload a picture to Photobucket.

2. When the picture is uploaded, click to edit the photo and resize it to either 125x125 or 150x150. Save.

3. Open another tab or window and go to your blog. Start a new post. If you have a private blog for testing things, use that one. (If you don't have a private blog for messing around and testing things, I recommend starting one. But more on that later.)

4. Go back to Photobucket and hover your mouse over the picture and you'll see a menu appear under the picture. Click the code where it says HTML Code. It should automatically copy for you.

photobucket screenshot
(Yes, I realize how ironic it is that this picture is hosted with Flickr. I prefer blogging from Flickr. Actually, I just really really like Flickr.)

5. Go back to your blog and paste Photobucket HTML Code that you just copied. It should look something like this:


<a href="http://www.pamhawk.com" target="_blank"><img src="http://i197.photobucket.com/albums/aa39/PassItOnPlates/giveawaybadgefeb1-7-1.jpg" border="0" alt="Example Badge"></a>


6. Change URL to point to you. This is the yellow highlighted text in the example above. I have changed it to my own URL.

7. Change alt to your blog or website title. This is the turquoise highlighted text in the example above.

8. Below this, add the following code.
<textarea name="textarea" cols="30" rows="5" wrap="VIRTUAL">
9. Below this, copy and paste another copy of the photobucket code that you edited above.
10. Below that, copy the following code.

/textarea

Make sense? Your completed code should look something like this. (In the box below.)


<a href="http://www.pamhawk.com" target="_blank"><img src="http://i197.photobucket.com/albums/aa39/PassItOnPlates/giveawaybadgefeb1-7-1.jpg" border="0" alt="Example Badge"></a>

<textarea name="textarea" cols="40" rows="4" wrap="VIRTUAL">


<a href="http://www.pamhawk.com" target="_blank"><img src="http://i197.photobucket.com/albums/aa39/PassItOnPlates/giveawaybadgefeb1-7-1.jpg" border="0" alt="Example Badge"></a>
</textarea>


It's ok to leave the line breaks in there. In fact, if you take out the line breaks, your text box will appear next to the badge instead of under it.
Here's the code with the line breaks:
giveaway 2-09a 125x125


Here's the code with no line breaks:
giveaway 2-09a 125x125


Now test it.

If this blog post is in a private blog you use for testing, just publish it.

If you opened a blog post in your regular blog, click on Post Options (above the orange Publish Post button) and back date it (to maybe a month ago) before publishing it. This way you can test it without interfering with your current blog posts and subscribed readers.

Open a new tab or window and open the same blog where you are currently working. Open another new post.

Navigate to the published post and click on the code in the box. Paste the code into the new blog post. Publish (or back date and publish.)

Look at the published new post. It should be just your badge without the text box.

Good? Yay! Delete this second blog post (with the badge only) and go to the first blog post where you created this. Save it as a draft for future needs. Copy the code and paste it wherever you want.

Not good? Examine the steps above and see if something was overlooked. You may have to "read" the HTML word by word to see if something's missing or incorrect.

...One last request? Post your blog URL here in a comment so we can all admire your handiwork.


Did you like this post? How about subscribing in a reader
or by Email?


(And remember, all comments are do-follow, so your comment left here supports YOU.)

Monday, February 9, 2009

Make a badge to promote yourself


Last August I posted a tutorial on using Flickr to design a Project Wonderful Ad. Today I'd like to expand on that and show you another neat thing you can do with the graphic you made in that tutorial.


If you are a more recent reader or would like to review, here's the original post:


Photobucket

Picking up where the last tutorial left off, open a new tab or window and go to Photobucket. Don't have an account? It's free and you can't complete the rest of the steps on Flickr because of Flickr's TOS. (There may be other photo sites you can use; I'm familiar with Photobucket, though, so that's the one I'll explain.)

Photobucket allows you to link the image to any URL you want. Flickr only allows you to link the image back to its original page in Flickr. If you break this rule, Flickr could suspend your account, and that would be bad.


Upload your newly created picture/graphic to your Photobucket account.


Once the picture is uploaded, click edit, then select resize.


Change the dimensions to 125x125 for sidebar badges. You can save it in other sizes as well. I highly recomment naming it with the size so whenever you want to find it quickly, you can. An example of this naming technique would be something like : Feb promo 125x125 and if you save it in another size for another purpose, you could name that one Feb promo 250x250.


When you hover your mouse over the picture in Photobucket, you get some code choices. (You can click Link Options to see all the choices.)


So now you're ready to have some fun. Try inserting it in blog posts, emails, Craig's List, MySpace, Facebook, other forums and message boards (if images are allowed)... Think of it like a sticker. Can you think of other places where you can stick your image?


Here's the key: Whenever you post the image somewhere, make sure it points to you: your blog, website, Etsy store, or to what ever you wish to promote. Depending on where you're posting it, you can either click on the image and turn it into a link (just like how you turn text into a link) or you can change the HTML to link it to your preferred location.

To change the HTML of the link, look at the code. At the beginning of the code, replace the text in blue with your link URL.

<a href="http://s197.photobucket.com/albums/aa39/PassItOnPlates/Web%20images/?action=view&current=giveaway1-09.jpg" target="_blank"><img src="http://i197.photobucket.com/albums/aa39/PassItOnPlates/giveawaybadgefeb1-7-1.jpg" border="0" alt="Photobucket"></a>

For futher tweaking, look where it says alt="Photobucket"

This is the text that will show up when your viewers hover their mouse over the picture. I'd recmmend changing that to the name of the item in the image, your site or shop name, or something that relates to what you're promoting.

That'll get you started. Come back Wednesday and I'll explain how to use what you've learned today to make yourself one of these:


Did you like this post? How about subscribing in a reader
or by Email?


Wednesday, February 4, 2009

Flickr Blog Header Generator


I was dinking around online the other day and came across another neat application by Big Huge Labs called Flickr Blog Header Generator. I experimented with two pictures of my Pass It On Plates, shown at the top and directly below.


What you do is upload a picture from your computer to the blog header generator, tell the generator if you want it to crop at the center, the bottom right, or top left of your picture, then click Create.

Ta dah! You've got a cropped version of your picture.

I wanted to see how the cropping would vary, so I used a picture from last week's Super Family Fun Day (that's what I call it at home when everyone pitches in with housework then we go somewhere fun for the rest of the day. We went to the beach. Yes we're in Oregon and it's still winter... that's another story...)

Here's the original picture:


Here's the same picture cropped...
Center:


Upper Left:


Lower Right:


What I was thinking was that while this would be nice for a blog, this could be awesome for Etsy.

Stay tuned for another easy tutorial on how to Etsy-size this. Meanwhile, I put the link for the Blog Header Generator in the sidebar under Blog Bling. And you can click here for the link, too.


(And remember, all comments are do-follow, so your comment left here supports YOU.)


Did you like this post? How about subscribing in a reader
or by Email?


Monday, February 2, 2009

La Margarita

Today I'd like to introduce you to La Margarita, a Mexican restaurant here in my town. Like most restaurants in towns across the US and beyond, business is slow because people are not spending like they used to. La Margarita has engaged in a brilliant Guerrilla Marketing tactic to bring in paying customers and keep them coming back for more.

At each table (under the glass table top, actually) is a list of classes offered on Wednesday nights that teach subjects such as making a particular mole sauce, paella, a variety of appetizers, and even a tequila tasting (with snacks, of course.) The cooking classes include a margarita, and cost $40 per person.

If you think about this from a marketing standpoint, they not only have 10 people attending each class, that's $400 on a slow night BUT the restaurant benefits in several ways:


1. Each attendee also gets to personally know the staff, the chef, the food... developing a deeper relationship which leads to customer loyalty.


2. People who attend the classes learn something new while the restaurant cultivates a rich word of mouth advertising campaign.

"Mary, this enchilada is wonderful. How did you learn to cook Mexican?"
"I took cooking class at La Margarita."
"The restaurant?"
"Yeah, the one downtown. It was great. The staff were really fun and they make a mean margarita."


3. Because their classes are held on a Wednesday night, this brings in extra cash on what is traditionally a slow night for restaurants. Brilliant.


4. By teaching a little about what they do (or hosting a demo such as tequila tasting) they are establishing themselves as experts in their field, making them the go-to place when people want knowledge and information. This puts their percieved expertise above their competition.

5. When people sign up for classes, the restaurant has the opportunity to invite them to opt in to a newsletter (have you heard that before on this blog?) or to get on the restaurant's mailing list for special events, coupons, exclusive offers, etc. Now I don't know of La Margarita is doing this last step, but they should take advantage of continually marketing to this receptive audience.


It's a win-win, win-win, win-win-win-win.

Plus, there's already a little local buzz by a widely read local restaurant blog called eatsalem.com, so just by offering classes, they've gotten a little extra advertising thanks to the folks at eatsalem.com. Then of course, there's this blog post but since most of you are probably not from the Salem area, I doubt this post will make a difference to La Margarita.


Now take a look at your own business and see if there's some creative thing you can offer to bring in new customers and keep all customers coming back for more?


(And remember, all comments are do-follow, so your comment left here supports YOU.)


Did you like this post? How about subscribing in a reader
or by Email?


PS: In case you're not familiar with Guerrilla Marketing, according to Wikipedia, "Guerrilla marketing is an unconventional system of promotions that relies on time, energy and imagination rather than a big marketing budget." This is the marketing technique you've been learning here at PamHawk.com, and for small businesses such as a blog, Etsy shop, or other indie business it's the most cost-effective way to get your name out there and get customers to come in.


PPS: If you're a small business (or a restaurant!) who would like to talk about some low cost but high impact ways you can improve your bottom line, zap an email over to me at pioppam [at] gmail.com