Showing posts with label Tutorial. Show all posts

Wednesday, April 15, 2009

Add a Recent Comments widget

Are you a comments junkie? While totally guilty of not leaving a trail of comments everywhere I go, I LOVE comments on my blog posts.

Here's a way to engage your readers in your blog content and possibly coax more comments from them: add a widget that shows off recent comments to your blog.

It looks like this.
These are the most recent comments from my family blog, The Adventures of Pam & Frank:


Want to add one?
Here's how you can do it in your Blogger Blog:

  1. Start a new HTML widget in your sidebar.
  2. Copy the code in this text box and paste it into your widget.


  3. Without adding any spaces, type in the number of comments to show. I have mine set to show the 5 most recent. Remember to type in the number - don't spell it out.
  4. Now copy the code in this text box and paste it into your widget.


  5. Now for the good part. Where are the comments you want to show off? Copy the URL of that blog and paste it here without adding any additional spaces. Don't forget to include the http:// part.
  6. Now copy this last section of code in this text box and paste it at the end of your widget.


  7. Save. Drag it to the location where you want this nifty widget, then save the layout.
  8. Look good? Yay! Not showing up? Let me know here and I'll see what kind of troubleshooting I can do for you.


Did you like this post? How about subscribing
in a reader or by Email?

Monday, April 13, 2009

Create a Scrolling Marquee for Images & Buttons

The other day I was looking for a hit counter and came across an interesting feature. Unrelated, of course, but it piqued my interest and thought I'd share it with you.

It's a scrolling marquee for images like this ( I used images from my sidebar. You can use whatever you want.)


Simply Fabulous Blogger Templates

Handmade Showcase

Sweet 'n' Sassy Girls


I saw this feature on sister sites: http://www.sweetnsassygirls.com/ and http://barefoot-mommy.blogspot.com/

Not only is controlling clutter an ongoing issue at home, but also on one of my other blogs. I had to find out how they did it. A little research revealed the nuts and bolts of this scrolling feature.

◘ ◘ ◘ ◘ ◘

Would you like to add this to your Blogger blog? Here's a simple tutorial.
Note: Each set of steps shows you how to add one image to your marquee. Repeat these steps for each image you want to add.

In Blogger, go to your Layout tab and click to add new element. Choose Add HTML. When pasting in the code, do not leave any blank spaces between one section of code and another unless instructed to do so.

1. Copy and paste the following code into the box:
<a href="
Paste the URL of the site your image will link to. End it with:
" target="_blank">
This will open the link in a new window so your readers don't lose your page.


2. Copy and paste the following code:
<img alt="
Type in what you want your readers to see if they hover their mouse over the image. You can just type in the name of the site that it links to.


3. Continue by pasting in this code:
" src="
Then paste in the image URL. How do you find it? There are a two different ways you can locate it.

a)
In the text box where the site invites you to grab their button, look for code that starts with http:// and ends with .jpg Highlight and copy the entire bit of that code. To make it easier to find, you may want to copy all of the code from the text box and paste it into a notepad document so it's easier to see. In the case of Sweet 'n' Sassy Girls, their image URL is
http://i267.photobucket.com/albums/ii296/strawberyred/sassybuttondots-1.jpg

b) If you right click on the picture, you'll see a menu pop up. One of your options may be to copy image location. If you see that option, click it. That's what you need.


4. Next, copy and paste in this code:
" title="
Type in the name of the site that this image goes to (it can be the same thing used in step 2.)


5. Finish up by copying and pasting this code:
"></a><br/>


Repeat steps 1-5 until all your badges are in place. When you are done, end the whole thing with this code:
</marquee>

◘ ◘ ◘ ◘ ◘

Now, would you like to customize this a little?
The different elements for how your marquee behaves are:

onmouseover="this.stop()"
This stops the marquee from scrolling when you hover your mouse over it. You can delete this code if you don't want it to stop.

onmouseout="this.start()"
This resumes the scrolling when you move your mouse off the marquee.

scrollamount="2"
This is your speed. I can't tell you what number is what speed, but 4 is approximately twice as fast as 2. You can experiment with this, but make sure it's slow enough for people to read as it zooms by.

loop="true"
This makes your marquee scroll endlessly. If you want it to scroll once through the list and stop, change true to false.

direction="up"
This scrolls everything in an upward direction. To scroll down, change the word up to down. If you want it to scroll from right to left, change the word up to left. From left to right, change it to right.

align="center"
This places your marquee in the center of your space. You can change it to left or right if you want it aligned with either margin. For a marquee in the sidebar, my personal preference is to center it.

width="150"
height="300"
You can adjust these to fit them within your space. If the width is more than your sidebar, the images will be cut off, which doesn't look so great. If you're scrolling from side to side, you can change the width and height to fit the space you're using.

For more details on how to customize your marquee, check out this blog post by Kang Rohman.


Did you like this post? How about subscribing
in a reader or by Email?


Wednesday, March 25, 2009

Blog Header for Etsy Tutorial

About six weeks ago I showed you a fun tool called a Blog Header Generator. While this would be nice for a blog, this could be awesome for Etsy.

If you missed the earlier post, you can check it out here: http://www.pamhawk.com/2009/02/flickr-blog-header-generator.html

I am currently building a website for my high school. The school closed in 1990 when the school district dissolved (very sad for all of us) and now we have an all school reunion being planned for next year. I'm using this technique to create a header for the website, but you can use this technique to a header for your Etsy shop, your blog, a website, or wherever.
This is soooo easy.

1. Find a picture you want to use.
In this example, I'm using a photo scanned from an old yearbook.

2. Run your picture through the blog header generator (There's a link in the sidebar, too.)
After trying it with Center, Upper Left, and Lower Right, I decided on Center. Here's the blog header that was generated. Save it to your computer.

Why not just crop and edit in flickr or another program? I could, but this crops it to ideal dimensions and scales the picture to the correct width. It's just easier and faster this way.


3. Upload the picture you just saved to your flickr account.
Click Edit, then click the tab that says Create.
Now click Text to add your title. Adjust the color, size, font, and placement until it's perfect.

In this case, I used the name of the school, since that's also the name of the website. You could use your blog name, your Etsy shop name, and if you're using this header for a special sale or special event you can customize your text to promote this event.


Ta dah! Finished product. You can see that after adding text, I also clicked Frames and added rounded corners.


If you want to see this in action, you can take a peek at the school website at www.ondossagonaggies.com

Meanwhile, if you try this, please comment here with your links so we can all visit your shop and see your handiwork!


Did you like this post? How about subscribing in a reader or by Email?


Wednesday, March 11, 2009

Tips and tricks for uploading photos to Flickr

My mom is starting to upload photos to her flickr account. Since she is the "keeper of the family photo album" with pictures from almost 100 years ago, I have been encouraging her to scan and upload all the photos so they can be shared with our extensive family scattered across the globe.


She's going to practice on a few more recent pictures first.


I wish we lived closer, but with over 1700 miles between us, I emailed her some instructions that I would like to share with you as you learn to navigate the wonders of flickr.


How to upload from the flickr website:


  1. Go to http://www.flickr.com/ and log in to your account. If you don't have an account, you can log in with your Yahoo identity.

  2. You can upload photos in a couple of ways. The easiest is to click "Upload Photos & Video" then click "Choose Photos & Video." Then navigate to the folder on your computer where you have your images stored and click on them.

  3. Click Upload.


Tips:


  • When you open the folder where your pictures are, click View on the top task bar then click Thumbnails to see the actual pictures.

  • Use your mouse and drag to select several pictures in a block.

  • To select several in a linear manner, hold down the shift key on the keyboard and use your mouse to click the first and last image in the series that you want to select. Let up on the shift key when you're done clicking with the mouse.

  • To select a few pictures from the group, hold down the CTRL key on your keyboard and then use your mouse to click the pictures you want. Let up on the CTRL key when you're done clicking with the mouse.


How to upload via email:


  1. The first time you want to do this, you will need to log in to your Flickr account and click the dropdown arrow for You and select Your Account.

  2. Click the link that says Email.

  3. Click your Flickr upload email address and attach the photos to the email that opens up. You can also save this email address and email pictures to your flickr account without having to go to flickr.

Note: When you email photos to your flickr account, they will be public and visible to anyone. If you want to keep them private, just email them to your flickr email address and add +private to your address so instead of username@photos.flickr.com it will be username+private@photos.flickr.com You can change the photos from private to public later, when you log into your flickr account. For more flickr email tips, follow the first two of the email steps and click the edit link to the right of your flickr email address.


Did you like this post? How about subscribing in a reader
or by Email?


(And remember, all comments are do-follow, so your comment left here supports YOU.)

Wednesday, March 4, 2009

Make a clickable photo link

Today I'd like to share a basic blogging tip on how to make your photo a clickable link. This will come in handy for all you Etsyians and Art Fire-istas. (Art Fireians? Art Firens? What do you call yourselves, anyway?)

This tip is pretty easy (for blogspot blogs - sorry to other platform users, I'm just not familiar):

Insert a photo into your blog post. You can either upload a photo from your computer or you can upload from a URL. Once the picture is uploaded, click on the photo to highlight it. (You'll get the little white squares in the corner.) Then click on the link button next to the text color button.

When the window opens, paste in the URL (make sure it only has the http:// once, not twice) then click ok.

Ta dah! Your picture is now a link.

Now here's something EVERYBODY should be doing, regardless of blogging skill.

People like clicking on pictures, so make your pictures clickable links as often as possible.

Is this a picture of something you're selling? If you uploaded it from a flickr URL, then it must link back to its flickr page. Make sure it's organized into a set of similar items so people can view your "portfolio," so to speak.

If you uploaded it from your computer or from another URL like Photobucket, then by all means link it to your sales page or shop. Give your readers and viewers every nudge and assistance to make it easy to buy from you.


Did you like this post? How about subscribing in a reader
or by Email?

(And remember, all comments are do-follow, so your comment left here supports YOU.)

Wednesday, February 25, 2009

Promote your blog via Flickr

Do you use Flickr? You'll love this tip to use Flickr to promote your blog.

1. First of all, when you log into Flickr, click on the drop down arrow by the tab You and select Your Account.

2. This will bring you the the tab that says Personal Information. Click the tab that says Extending Flickr. Look for Your Blogs and click Edit.

3. Click Add A Blog and follow the instructions. If you want to add more than one blog, repeat the process for each blog you want to add.

4. Next, go to a picture that you want to use in a blog post. Above the picture, click Blog This and follow the instructions to post it to your blog. You'll see that there is a place for you to add text to the blog post. If you know a little HTML you can also include formatting like bold and italic, as well as links.

5. Post the picture to your blog, then click the link provided by Flickr to visit your blog. (It will open up in a new window so you won't lose your place at Flickr.)

Here is an example of one that I posted to my other blog:
------------------------------------------------

You can make this in my quick and super easy tutorial: How To Dress Up A Gift Box


------------------------------------------------

6. While at your blog, copy the link for the blog post you just made, then go back to Flickr and click return to this item's page.

7. Just below your picture there is a box to add a description. The box turns yellow when you hover your mouse over it. (It's above Comments.) Add a description and invite viewers to visit your blog post for more information. Here's where you'll need a little HTML to insert the link. If you're not sure how to add links with HTML, just copy this code:
<a href="
then without adding any spaces, paste your link and follow it by
">
next, type in the text you want people to click on and follow that by
</a>
Your completed link should look something like this in HTML:
<a href="http://passitonplatesblog.blogspot.com/2008/12/how-to-dress-up-gift-box.html"> How To Dress Up A Gift Box</a>
and your readers will see:
How To Dress Up A Gift Box

8. Add tags to your picture.

9. Now you're ready to promote your blog. Near the top of the Flickr page, click the drop down arrow for Groups and click on Search for a Group. Start searching based on your keywords, but don't forget to use category keywords as well, such as craft, food, family, etc. Join any and all groups where sharing your picture would be appropriate. The more, the better. I really don't know how many groups are on Etsy, but I guarantee there are thousands and thousands and I'm sure you'll find at least one that your picture fits into.

Do you sell on Etsy? Try these groups:
Etsy-Look and Learn
Craft
Get Crafty
Crazy For Knitting
Artisan Jewelry on Etsy
Painted Furniture
Softies

10. Watch your blog traffic. Depending on the "interestingness" of your picture, you could get a lot of traffic. This gift box photo has given me a nice bump in traffic, and even though I posted it over a month ago, I'm still getting a trickle of traffic from it. Your Flickr stats also show how many views that picture gets and you can even learn what search keywords people are using to get to your photo. If you include these words in your actual blog post, that will help guide search engine users to your blog post as well.


Two very important notes:

1. Flickr TOS requires that when you blog about a picture, the picture must link back to its page on filckr. If you like messing with your HTML, don't change where the picture leads to.

2. Flickr TOS also forbids selling on Flickr. If you have photographed something you have in your shop, you can blog about it but you cannot include links to your Etsy shop or mention that the item is for sale in the Flickr description.

(And remember, all comments are do-follow, so your comment left here supports YOU.)


Did you like this post? How about subscribing in a reader
or by Email?


Wednesday, February 18, 2009

Word of Mouth Gift Campaign tutorial

On Monday I showed you this Valentine Card from Krispy Kreme.
Today I'd like to tell you how you can create this kind of promotion for your own biz, blog, or shop.

If you're just joining us, you may want to go back and read Monday's post to learn the basics of this kind of promotion.


In Monday's blog post, I suggested different kinds of items you could give away for this kind of promotion. Since cards are easy, though, let's explore that avenue.

You can use your own images to print greeting cards at Flickr (check on Extending Flickr,) Photobucket, Vistaprint, pretty much any online photo storage site, your local photo printing shop, a local copy shop, or if you have a high-quality printer you could print your own. (Be careful about using your own printer, though. These cards cannot look cheap.) You could also get blank greeting cards at a craft store and use a quality photo adhesive to attach printed photos to the cards.

If you make your own photo cards, be sure to sign the card under the photo, just like artists sign their work. This elevates the perception of quality and makes the card more "exclusive." Besides, you need your existing customers to be excited about the cards, want to send them all out, and feel good about sending their friends a quality item.

Of course, make sure your photos are clear, professional looking, and appropriate for the card. You also need to make sure that you have the rights to use the photos. (Please always respect copyright laws.)

Just so you have an idea of the cost to print cards
, the cards at Flickr (via Moo) are $24.95 for 10 greeting cards or $10.99 for 16 note cards. This is just one example in many many many options out there. You will need to do a little research (try Googling "Print your own greeting cards") and find one that is a good fit with what you're doing.

If you make cards or enjoy scrap booking, you could whip up a set of your own handmade cards, as well.

Add your coupon code to the back of the card with easy to follow instructions on how to redeem it.

Here's an example of how your promotion would work:
(I'll use my plates business as the example.)

When someone buys a Pass It On Plate Lite at the current full retail value of $29.95, they receive 5 photo birthday cards (that I made at Flickr) to send to their friends. The photo cards have a beautiful food picture on the front and the recipe inside the card on the left. On the back of the card is a coupon for a free PlateWrap (and free shipping, of course.)

If my customer sends out all five cards, and all five people redeem their free PlateWrap, here's what it cost me to acquire each new customer:
  • While I'm not going to reveal my cost vs. retail price, let's just assume my cost for each PlateWrap is $10.
  • I sent my customer $12.50 in greeting cards. (10 cards for $24.95)
  • They send out all five cards, each of whom redeem their free gift. (My cost is $10 per gift.)
  • A $10 item cost times 5 people = $50 in free merchandise
  • $50 in free merchandise + $12.50 for greeting cards = $62.50
  • $62.50 divided by 5 people is $12.50. (...an interesting coincidence.)
  • My new customer cost only $12.50 to acquire. Now I can continually market to this customer and (sit down for this) send them my regular snail mail newsletter.
Compare my $12.50 spent to find a genuine customer to the amount of money normally spent on advertising where you're hoping to generate some interest. I have done craft shows where the table cost me $25 and I only had one customer by a $5 item. That customer cost me $20, and because they paid cash and weren't interested in signing up for me newsletter, so there's no way I will be able to market to them.

$12.50 is a bargain.

Please leave comments here if you have questions about how you can make this work for you. Also, if you try this, please post links to your site or blog where you announce this promotion. I'd love to see what creative idea you came up with (and I'll do a little advertising for you.)


Did you like this post? How about subscribing in a reader
or by Email?


(And remember, all comments are do-follow, so your comment left here supports YOU.)

Wednesday, February 11, 2009

Button with HTML Code Box Tutorial

Photobucket


Ever stumble across a blog that has something like this
in the sidebar on in a blog post? Would you like one for your blog? It's actually pretty easy.

Before starting, I just wanted to make sure you know that if you want the badge to point to your website, blog, or etsy store, you cannot use your Flickr account. Sure, you could use Flickr to edit the photo and add words or whatever, but you need to upload it to Photobucket.

If you're not too familiar with Photobucket, here's the skinny
- it's kinda sorta like Flickr, but with different TOS. Photobucket allows photos hosted there to be used as links to other sites outside of Photobucket. Photos hosted on Flickr have to link back to the original photo on the Flickr site.

1. Upload a picture to Photobucket.

2. When the picture is uploaded, click to edit the photo and resize it to either 125x125 or 150x150. Save.

3. Open another tab or window and go to your blog. Start a new post. If you have a private blog for testing things, use that one. (If you don't have a private blog for messing around and testing things, I recommend starting one. But more on that later.)

4. Go back to Photobucket and hover your mouse over the picture and you'll see a menu appear under the picture. Click the code where it says HTML Code. It should automatically copy for you.

photobucket screenshot
(Yes, I realize how ironic it is that this picture is hosted with Flickr. I prefer blogging from Flickr. Actually, I just really really like Flickr.)

5. Go back to your blog and paste Photobucket HTML Code that you just copied. It should look something like this:


<a href="http://www.pamhawk.com" target="_blank"><img src="http://i197.photobucket.com/albums/aa39/PassItOnPlates/giveawaybadgefeb1-7-1.jpg" border="0" alt="Example Badge"></a>


6. Change URL to point to you. This is the yellow highlighted text in the example above. I have changed it to my own URL.

7. Change alt to your blog or website title. This is the turquoise highlighted text in the example above.

8. Below this, add the following code.
<textarea name="textarea" cols="30" rows="5" wrap="VIRTUAL">
9. Below this, copy and paste another copy of the photobucket code that you edited above.
10. Below that, copy the following code.

/textarea

Make sense? Your completed code should look something like this. (In the box below.)


<a href="http://www.pamhawk.com" target="_blank"><img src="http://i197.photobucket.com/albums/aa39/PassItOnPlates/giveawaybadgefeb1-7-1.jpg" border="0" alt="Example Badge"></a>

<textarea name="textarea" cols="40" rows="4" wrap="VIRTUAL">


<a href="http://www.pamhawk.com" target="_blank"><img src="http://i197.photobucket.com/albums/aa39/PassItOnPlates/giveawaybadgefeb1-7-1.jpg" border="0" alt="Example Badge"></a>
</textarea>


It's ok to leave the line breaks in there. In fact, if you take out the line breaks, your text box will appear next to the badge instead of under it.
Here's the code with the line breaks:
giveaway 2-09a 125x125


Here's the code with no line breaks:
giveaway 2-09a 125x125


Now test it.

If this blog post is in a private blog you use for testing, just publish it.

If you opened a blog post in your regular blog, click on Post Options (above the orange Publish Post button) and back date it (to maybe a month ago) before publishing it. This way you can test it without interfering with your current blog posts and subscribed readers.

Open a new tab or window and open the same blog where you are currently working. Open another new post.

Navigate to the published post and click on the code in the box. Paste the code into the new blog post. Publish (or back date and publish.)

Look at the published new post. It should be just your badge without the text box.

Good? Yay! Delete this second blog post (with the badge only) and go to the first blog post where you created this. Save it as a draft for future needs. Copy the code and paste it wherever you want.

Not good? Examine the steps above and see if something was overlooked. You may have to "read" the HTML word by word to see if something's missing or incorrect.

...One last request? Post your blog URL here in a comment so we can all admire your handiwork.


Did you like this post? How about subscribing in a reader
or by Email?


(And remember, all comments are do-follow, so your comment left here supports YOU.)

Monday, February 9, 2009

Make a badge to promote yourself


Last August I posted a tutorial on using Flickr to design a Project Wonderful Ad. Today I'd like to expand on that and show you another neat thing you can do with the graphic you made in that tutorial.


If you are a more recent reader or would like to review, here's the original post:


Photobucket

Picking up where the last tutorial left off, open a new tab or window and go to Photobucket. Don't have an account? It's free and you can't complete the rest of the steps on Flickr because of Flickr's TOS. (There may be other photo sites you can use; I'm familiar with Photobucket, though, so that's the one I'll explain.)

Photobucket allows you to link the image to any URL you want. Flickr only allows you to link the image back to its original page in Flickr. If you break this rule, Flickr could suspend your account, and that would be bad.


Upload your newly created picture/graphic to your Photobucket account.


Once the picture is uploaded, click edit, then select resize.


Change the dimensions to 125x125 for sidebar badges. You can save it in other sizes as well. I highly recomment naming it with the size so whenever you want to find it quickly, you can. An example of this naming technique would be something like : Feb promo 125x125 and if you save it in another size for another purpose, you could name that one Feb promo 250x250.


When you hover your mouse over the picture in Photobucket, you get some code choices. (You can click Link Options to see all the choices.)


So now you're ready to have some fun. Try inserting it in blog posts, emails, Craig's List, MySpace, Facebook, other forums and message boards (if images are allowed)... Think of it like a sticker. Can you think of other places where you can stick your image?


Here's the key: Whenever you post the image somewhere, make sure it points to you: your blog, website, Etsy store, or to what ever you wish to promote. Depending on where you're posting it, you can either click on the image and turn it into a link (just like how you turn text into a link) or you can change the HTML to link it to your preferred location.

To change the HTML of the link, look at the code. At the beginning of the code, replace the text in blue with your link URL.

<a href="http://s197.photobucket.com/albums/aa39/PassItOnPlates/Web%20images/?action=view&current=giveaway1-09.jpg" target="_blank"><img src="http://i197.photobucket.com/albums/aa39/PassItOnPlates/giveawaybadgefeb1-7-1.jpg" border="0" alt="Photobucket"></a>

For futher tweaking, look where it says alt="Photobucket"

This is the text that will show up when your viewers hover their mouse over the picture. I'd recmmend changing that to the name of the item in the image, your site or shop name, or something that relates to what you're promoting.

That'll get you started. Come back Wednesday and I'll explain how to use what you've learned today to make yourself one of these:


Did you like this post? How about subscribing in a reader
or by Email?


Saturday, January 3, 2009

Become a blog sleuth...find out where bloggers get their bling

Remember when I told you about My Live Signature? (It's in this blog post.)

I told you I looked into a blogger's code to find out where she got her signature from. Maybe I'm nosy or overly curious, but I like click on a lot of stuff and learn all kinds of interesting things.
And then I share it with you. :o)

(Ok, so there's a little of my dirty laundry. Still friends?)

Here's the secret to looking at the code on any blog (or website):

If you use Firefox, highlight the section you want to look at. Right click your mouse on the highlighted section, and a little menu will pop up. Click on View Selection Source. A new window will open, showing the code of your selected area.

If you use Internet Explorer
, it's little trickier. Right click anywhere on the page and a new window will open, showing all the code for the entire web page. It's a little tricky because now you have to look for the code you're interested in. If you're not fluent in web design languages, this can be a daunting task.

To make this a little easier, look again at the web page you're digging into. Find some text near the code you're interested in. For example, in the case of this blog post, if you wanted to find the code for this neat widget (and please ignore the "get Widget" thingy. Widgetbox always makes it easy to get their cool stuff):


You would just need to do a search on the words "Kitty Clock" (Hold down CTRL then hit the F key on your keyboard to bring up a search box.) You should see the code right above the words you searched for. Go ahead and try it. The code would be sandwiched between
cool stuff): and You would just
See it?

Now that you found the code, go to the website that features it. In the case of the clock, you'd go to Widgetbox. When I looked at the code for the signature, I went to MyLiveSignature.com. Sign up (if required,) customize what you like, and add it to your blog.

Now for the ethical stuff that is equally important. If you find some interesting code that you want to use, make sure you are allowed to use it. If it was created specifically for that blog, it's theirs to use and falls under copyright laws. You can't use it. You could always go to widgetbox or other widget sites and look for something similar, or contact the blogger who has the cool widget and ask where they got it. You may have to pay for the code, but if it's that fantastic it might be worth it.

If you find some code that you are allowed to use, give credit where credit is due. Introduce the new widget to your readers in a blog post and publicly thank the blogger or give them credit for finding it first. Include a link to the blog or site where you found the widget. You don't have to disclose how you sleuthed around to find the code, but it's a nice gesture to credit them for finding it for you.

And always, if you found some cool code and added it to your blog, post a comment here with a link so we can all visit and admire your handiwork!

(And remember, all comments are do-follow, so your comment left here supports YOU.)


Did you like this post? How about subscribing in a reader
or by Email?


Monday, December 29, 2008

How to add a signature to the bottom of your post

A little while ago I introduced you to MyLiveSignature.com where you can create your own signature to add to the bottom of your blog posts.

Today I'll share a little tutorial on how to add your signature to your blog posts. This tutorial is for Blogger blogs, since that's what I'm familiar with. If you use Wordpress, TypePad, or another platform, you may know of some resources for you to tweak the appearance of your blogs. I'm sorry I'm not able to help you here.

First, go to MyLiveSignature.com
(open it in a new tab or window) and create a signature that you want to use. Continue to the end where you get the HTML code for your new signature. Select all the code and copy it. (You can click your mouse on the HTML then on the keyboard hold down CRTL while hitting the A to select all, then hold down CTRL while hitting the C to Copy.)

Next, open your blog ...again in a new tab or window, so you can keep your signature and this tutorial visible, just in case you need to refer back to either one.

In your blog, click Customize in the upper right hand corner, then click on the Settings tab.

Now click Formatting. (It should be under the three tabs, third link from the left.)

Scroll down until you see Post Template.

Paste the code from the My Live Signature into the Post Template box.
If you want a line of space between your blog post and the signature, add </br> in front of the code you just pasted in. For each extra line you want, add one more </br>.

Save settings, and you're done. Every post you make from this point forward will have your signature added to the bottom.

If you want to test it, go ahead and write a little blog post to show off your new signature to all your readers. And if you do that, leave a comment here with a link to your post so we canall swing by and check it out ...and leave you our congrats in your comments!

I still have to tell you how to find out where other bloggers get their neat widgets and gizmos from. Stay tuned for that little tidbit...

(And remember, all comments are do-follow, so your comment left here supports YOU.)


Did you like this post? How about subscribing in a reader
or by Email?


Monday, November 10, 2008

Incorporating Video Into Your Blog

Last week I posted a brief video of my car into this blog to show my friend Amador how easy it is to post videos online.

Today I'd like to share a quick how-to so you can post your own videos on your blog.

It's a lot easier than most people think. Like I said last week, I don't own a video camera.

Equipment Needed:
#1 - A digital camera that can shoot video. If you're not sure about yours, check the various shooting modes you have: close ups, scenery, action, flash, movies... Your shutter button may have a little movie camera icon on or near it.
#2 - A method of transferring images from the camera to your computer. Could be a memory card or a cable that hooks them together.
#3 - A computer with an online connection
#4 - A blog or other website where the video will ultimately be shown

If you're reading this, chances are you have #3 on the list. If you also have at least #1 and #2, then you're ready to start.
Ready?
First, decide what you will use for your #4 in the above list. It could be YouTube, but I'll be expanding on this concept in upcoming posts and to take advantage of all the great tips coming up, you may want to have your own site (or blog.) At the very least, you'll want a website or blog that will let you submit your video for all to see (other than You Tube.)

Step One: Choose your subject matter.
This first video will be your demo, so don't stress out about this.

If you want to be the star of your demo, set the camera on a counter or cabinet and step back so it can show your lovely face as you recite a short poem or sing a silly song. Actually, you could simply introduce yourself. That would be a short and sweet 15 to 20 second video perfect for your demo.

If you'd rather not be the star (I understand completely,) then find something interesting, be it a family pet, a tree in the yard, or a goofy kid.

Step Two: Shoot your video.
Don't make it too long, just 30 seconds to one minute is enough.
A little camera shake and wobbliness is ok for your demo. You're a real live human.

Shooting tips:

- Make sure you talk during the video to keep it interesting. Describe what you are shooting and explain something interesting or significant about your subject.

- Talk at a comfortable pace, not too fast, and speak clearly. Smile - people will hear it.

- You may want to plan ahead with what you will say to avoid dead space or overuse of words like "Ummm" and "Uh..."

- Make sure there is sufficient light for your viewers to see the subject.

- When moving the camera from one subject to another, move slowly. Rapid movements make viewers dizzy and disoriented with your scene.

Step Three: Upload your video.
If you can take the memory card out of the camera and insert it into a port on your computer, you can upload the video directly you YouTube.

OR - If you need to connect the camera to your computer with a cable, upload the video to a file where you can find it. You can upload it to You Tube from there.

Go to YouTube and either log in or sign up.
In the upper right hand corner, you should see a button that says Upload. Click it and follow the instructions to upload the video you just made.

Your upload will take a few minutes, depending on how fast your internet connection is.
When I upload videos, I notice that YouTube says to wait until I see a message telling me the video is done but it seems to take forever. Meanwhile, if I open a new window and go to You Tube, my video is there, ready to play with. You video may be ready before YouTube tells you it is - you may want to check on it in a new window after a few minutes.

Step Four: Embed your video into your blog.
Note: What blog would you like to post your demo video to? You may want to consider that at this point. Ok. Open that blog. Ready?

When you see your video, grab the code to embed it, and open a new post in your blog. Click to edit the HTML of the post, and paste in the code from You Tube. Add any appropriate comments and publish it.

Ta-dah!

Once you get the hang of this, you should be able to produce a great little video for your blog in about 15 minutes or less.

Coming up next: I've got some big ideas for you! Check back later this week to find out how you can use video in your blog to increase traffic and/or Etsy sales!


Did you like this post? How about subscribing in a reader
or by Email?


Friday, September 19, 2008

Blog Bling: Quick Ribbon

Here's a bit of blog bling for you to try out: Quick Ribbon.
I discovered this at Psilology, and had to give it a go. The results - very easy, looks good.

I'm using this tool on my Pass It On Plate blog and Plate Diaries
to promote giveaways and sales. The ribbon is a link, so when people click it they go to the blog post that talks about that promotion. You could use it to advertise your special events or just point people toward your store/shopping cart. It's up to you.

The Quick Ribbon website makes it extremely easy to design your ribbon. The trick is installing it into your blog. Installation is easy, but it means you have to go into the actual HTML of your blog. Don't worry, I'll walk you through it here.

Install your own Quick Ribbon in 5 steps.
1. Go to the HTML of your blog. As always, copy and paste ALL your code into a notepad document on your computer before touching anything. Save the document.
2. Near the top of your code, find the word <head>. You could hit ctrl+F and your computer will find it for you.
3. Insert your Quick Ribbon code just under <head>.
4. If you have a favicon under <head>, you can put this above or under your favicon. It shouldn't matter.
5. Save, then go look at it.

One note: I discovered that the code makes the entire corner a hot spot, meaning if you click anywhere in the corner, even if the ribbon isn't covering it, it will take you to the link you programmed into the ribbon. If you are using Blogger, this will affect how you get to your dashboard. Just click New Post and navigate to your dashboard from there. It's a little annoyance in my opinion, but I can live with it for the occasional use of the ribbon.

Ok - go try it!
When you have it installed, be sure to comment here with your URL and we'll all go and check it out!


Monday, September 15, 2008

Favicon Tutorial -
Making a little tiny
picture thingy

A couple weeks ago, I posted here on this blog, and here on my other blog, a little tutorial on how to find hex codes when you're tweaking the color of your blog template.

In the screen shots used for the tutorial, you can see the Firefox various tabs I had open at the time. I was careful to make sure that the visible items were suitable for world-wide viewing, and didn't think much beyond "Is that private information or not?"

I had a good chuckle when Brad from BradBlogging.com left this comment on the post:
LOL. It's pretty cool seeing your favicon in a tab on a screenshot..
Thanks for visiting Bradblogging.com!

Yeah Brad, that actually is pretty cool. I guess the secret's out about what I read when I post. (I haven't heard from Chris Brogan, yet. Score one for Brad for picking this up first - of course Brad, you have two tabs to Chris' one.)

To my dear readers, if you are wondering what the heck Brad is talking about, the favicon is the little picture thingy that you see on the left side of each tab in the picture below. There's also a favicon in the address bar on the browser in the picture. (Brad's favicon is a bold, dark letter "B")


If you look up at the address bar at the top of your screen right now, you probably see a favicon, too. It could be the orange Blogger "B" or my pink zinnia that I use as my avatar everywhere I go.

Would you like to make one for yourself? It's pretty easy. You can do this.

There are a lot of good tutorials out there, so instead of repeating what other folks have said, I'll just point you toward two that are well-written and not too tech-y.

Clickfire.com
Short and sweet. Easy if you already have a website or hosting to which you can upload your favicon image.

bluejar.com
Here, Sarah mentions using Flickr to host your favicon image.

When you get yours installed, leave a comment here and share your link so we can see your favicon masterpiece.

PS: Hey Brad, when you leave a comment here, would you mind sharing how you found this post? Technorati, Google Alerts, etc? I'd like to use it as an example for a future post.
Thanks!
:o)

Friday, September 5, 2008

One more little HTML lesson tutorial

You know how to make bold and italic text, right?
Those are just a quick little <b>before and a</b> after for bold, and a little <i>before and a</i> after for italic.

How about a strike out? My clever daughter just showed this one to me.
Just type in this text: <strike>strike</strike>

Want to see it in use?
Sure you do. Besides, it'll make you feel really good about your well behaved kids.

While typing this, my exuberant 12 year old nearly 13 year old (and old enough to know better) was sitting on the back of the couch, reading over my shoulder as I typed. Something brushed my right ear and there was a huge WHUMP! and a shriek as she fell over backwards, landing on the cushion of the couch.

Turns out my darling daring daughter nearly kicked me in the head as she lost her balance. I tried to scold her and she kept whooping and yelling, "That was fun!!"

She agreed to wait until I'm done before she tries again. She needs a ride to a friend's house later this evening.

Thursday, September 4, 2008

Another
Quick-n-Easy
HTML
Tutorial

Check it out - line breaks in the blog title!

Want in on the secret? It's four little characters of html code that indicates a line break. It's so easy.

Here's the code: <br>
The BR means "Break"

When I typed in the title to this blog post, it looked like this:
Another<br>Quick-n-Easy<br>HTML<br>Tutorial

Easy, peasy.
Now off you go, to let all hell <br> loose with your use of HTML.

Wednesday, September 3, 2008

Keeping everyone on the same page
...an easy HTML tutorial

Have you noticed this? When you are visiting someone's blog or website and you click on a link, sometimes the link opens in a new window (or tab) and sometimes you leave the blog completely and jump over to the new link.

Staying or jumping has to do with how the html is written on the blog post or website.

Sometimes this is a good thing, jumping from blog to blog, and other times it's annoying because what you were initially reading was very interesting and now you have to hit the back button to figure out where you were before the link sent you shooting off to someone else's blog.

As for me, I like to keep my readers here, partly for their convenience, and (from a business standpoint,) partly so my brand is not forgotten too quickly. Would you like to do the same?

Without any foreign language instruction, here's how.
Denise, I'm going to use your blog URL as the example. I hope that's ok. Thanks!

1. Start a new blog post in a new window or tab on your browser so you can keep your eye on this tutorial.

2. Type in the name of the site you want to experiment with, then attach a link to it. Here's the example:
Denise Clenney's Changing Designs

3. Now flip over to your Edit Html tab on your blog post. Take a look at the code for what you just did. It should look like this: <a href="http://changingdesigns.blogspot.com/">Denise Clenney's Changing Designs>

4. If you are extremely unfamiliar with html, I'll explain the different parts here, and please pardon my lack of technical language. I may be geeky but I am not a geek.

a href= This tells the browser that this is a link.

"http://changingdesigns.blogspot.com/" Tells the browser where to go.

< > These brackets tell the browser that this is where the code is, and not to make it look like text.

Denise Clenney's Changing Designs This is the text link you see on the page. Sometimes it's underlined, sometimes it's a different color.

Since the first bracket started with an "a" this "/a" tells the browser that's the end and closes the code.

5. If you publish the blog post and click on the link, you will jump directly to Denise's blog. So let's go back to edit the blog post and modify the link you just put in.

6. Go to the Edit Html tab again and enter some extra code to tell the browser to open a new window or browser tab when this link is clicked. Here's the code again:
<a href="http://changingdesigns.blogspot.com/">Denise Clenney's Changing Designs>

7. In the spot between the end quote
" and the end bracket > you'll need to enter the following code: target="_blank"
(There is a space before the word target.)

8. The link now looks like this:
<a href="http://changingdesigns.blogspot.com/" target="_blank">Denise Clenney's Changing Designs>

Now for those of you who are anal retentive about this kind of stuff, there's more.
(You can't see me, but I'm sitting at the computer sheepishly raising my hand.)

If you feel the need to go back into any older posts, (and try to restrain yourself PAM HAWK,)
you can do a quick fix on all those pesky links that could potentially take your readers away forever.

1. Open any blog post you can't resist the urge to fix and go to the
Edit Html tab.

2. If you are using a PC, hold down the Ctrl key and tap the F key to open a Find dialog box. (If you have a Mac, sorry - I don't know how you initiate a search.)

3. In the search box, enter
a href="
Yes, you can copy and paste from this blog post.

4. Now highlight and copy this code
target="_blank"
Remember, there is a space in front of the word target.

5. Search the entire bit of blog post html, and every time you find a link, paste in the code. Just position your cursor between the "> and hold down Ctrl and V to paste.

6. Click search click search click search your way through the blog post until it's flawless. Or until you realize you really need to stop and do something more productive, *ahem* Pam.

Sunday, August 31, 2008

Three column blogger template

Many things we learn are out of necessity, not because we have a wish list of things we want to learn, just in case we later find a use for the knowledge. Ok, changing a car tire and first aid are exceptions to this, but many business and online activities are learned on the fly and when the need arises. This is how I learned the basics of HTML, but I am by no means an expert.

For a long time I had been wanting to change the Plate Diaries blog from two to three columns. The layout and organization is a mess and it's a hard blog to read. I finally sat down one day and poked around the internet, looking for a template to try. If you want to look around, your Google search terms for this could be:
blogger template three column

If you are interested in changing your blog template, first copy and paste all the HTML from your existing blog into Notepad (it's a no-frills word processing program on your PC.) Do not use Word because it will change the format and mess up your HTML. Save the document.

Next, open each widget you have on your blog sidebar and copy the HTML into another Notepad document. These may go bye-bye when you change your template and I know you don't want to risk losing all that stuff. Save this document, too.

Third step, while strongly suggested, is not required: start a new blog. Keep it private and out of the search engines, and use it just to mess around with the code and experiment. I've had one for months and every now and then I test something there before putting it on a public blog. This has been a lifesaver for me.

Next, find a template you want to use. I tried several beautiful templates from various "free blogger templates" blogs and got Blogger errors with each one I tried. Giving up on that, I reverted the test blog's template back to Blogger's Minima Stretch, then implemented the code found at this site:
http://tips-for-new-bloggers.blogspot.com/

The easiest way to find the locations mentioned in this tutorial are:
1. Open the above link in a new tab or window.
2. Open your blog's HTML page in a new tab or window.
3. Go back to the site with the code you will copy and hit Ctrl+F to open a search dialog box. Type in a little of the code you are to look for when inserting some new code.
4. Navigate back to your blog's HTML and search.

After spending all morning dinking around, looking for a template that works, and is the right width, there is only one thing I can say:

Perfect.


Tuesday, August 26, 2008

Finding HTML Colors

Have you ever tried changing the look of your blog or website and wanted to use a very specific color? No matter what program you use, be it a website or blog development software, Blogger or some other blog platform, there is usually a set collection of colors available and that's it.

This was the case when I made a recent tweak to this blog. I was frustrated with my "Thisaway Rose" template loading slowly on my cable connection and knew something had to change.

The little light bulb cam on in my head over my morning coffee today as I realized I should just switch to the "Minima Stretch" template and just change the background color. Duh. Don't know why I didn't think of that before...

So I make the switch and click the pink button to change the background. I wanted the blog to look pretty much the same as before, and when talking to Donna, my Pass It On Plates partner in Wisconsin, I like referring to this blog as "The Pink Blog" and the Plate Diaries as "The White Blog." We have one other blog that we use, just between ourselves, that we call "Projects." It's marked 'private' and we chat back and forth there and post articles, business links that we use, and it's a great place to collaborate. Our "Projects" blog is the subject of another post, though.

Back to colors.The Blogger color choices were way too dark and I don't really understand the Hex Code used. I tried fiddling with the numbers and letters but nothing seemed to change. Enter a Google search on "Hex code." The site December.com was at the top of the list so I checked it out.

Wowie. If you have ever searched for hex codes, this is the place to go.
Mind you, these are only the named cool-pinks. There are other hues, other saturations, and a whole section of un-named colors. I did try some un-named colors and Blogger didn't recognize them, but with thousands of hex codes at my disposal, I was able to find exactly what I was looking for.

.

.

Wednesday, August 20, 2008

Six steps to designing a Project Wonderful ad

Now that you have some info on buying and selling advertising with Project Wonderful, what ad will you use to advertise your site or hot new product? Today I'll show you how to make a great-looking Project Wonderful ad without any special computer programs.

You can create one in just 6 easy steps using your Flickr account.

1. Look at Project Wonderful and decide what ad size you want to make. This quick tutorial is for the 125x125 square ad.

2. Log into your Flickr account and choose an image. Click on it.
(I made an ad based on the image used for the giveaway blog post so they matched.)


2. Click Edit. Flickr's editing program, Picnik, will open. Be patient, it takes a moment. When it opens, you will see two tabs. One is Edit and the other is Create. You will start out in the Edit tab.


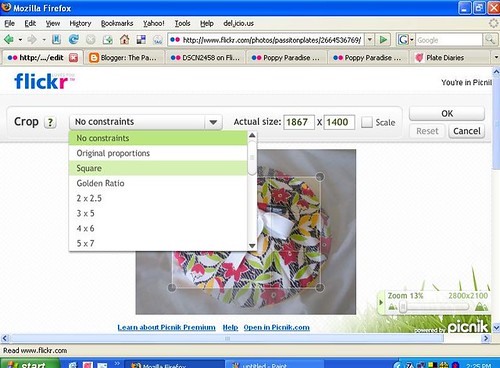
3. Crop your photo. If you are making a square ad, select the square from the drop down box. (These screenshots are from an upcoming blog post... You'll just have to bookmark this blog or subscribe so you don't miss my next Flickr tutorial.)


4. Resize your photo to the Project Wonderful ad size you want to make. In my case, I typed in 125 and Picnik did the rest. When the shape and size are to your liking, click OK.

5. Now for the fun part. Click the tab named Create. Type in your advertising word or words and play with the color, font, layout, and other settings until it's perfect.

..........

6. Save your work. Before you complete the save process, let Picnik know if you want to save a new copy or replace the original. I recommend always saving a new copy so you can use the original for other ads or projects. Save this image to a location on your computer so you can easily upload it to Project Wonderful.

Ta dah! Quick and easy.
And fantastic-looking.

If/when you make one, comment here with a link to your ad. I'd love to see how it turned out. Plus, if you send me a link to your ad, I'll write up a post to be published next week to show off all the ads. Hey, that's free advertising for you.

Ok, also... Come back tomorrow to find out who won the big giveaway!